This guest post from our conservation intern, Puneeta Sharma, continues the series of posts about the conservation of the Ferrar prints. Here she explains the more advanced techniques she has used to repair the prints, including using the facilities at the Fitzwilliam Museum.
Conservation studio day at the Fitzwilliam Museum
After spending three weeks working on the prints in the Old Library, I had the opportunity to spend a day at the paper conservation studio at the Fitzwilliam Museum, undertaking more advanced treatments and preparing housing material.
As there were limited resources in the Old Library for conservation work, it was really useful to carry out treatments on the prints to further ensure their stability. Working with Richard Farleigh, we treated nine prints, using a variety of treatments including immersion and float washing, lining, an acetone bath to treat a print containing mould and pressing.
Heavily stained prints were washed using both the float and immersion washing techniques, which help to transport discolouration out of the paper support. Prints were washed between 45 minutes to an hour and a half and then lined with Japanese tissue to provide support.
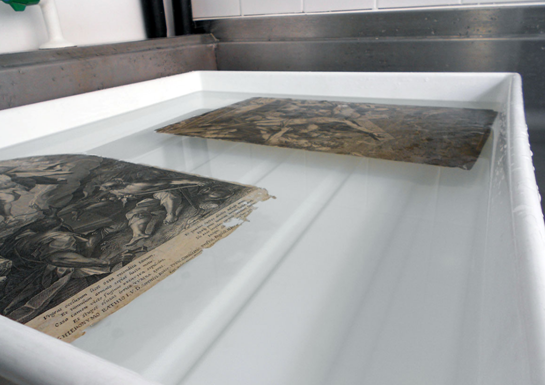
Washing the prints

Washing the prints
Whilst I was working in the Old Library, I stabilised prints that were fragmented and fragile with Japanese tissue in the form of repairs and infills. At the Fitzwilliam Museum, these prints were lined to provide a support to the fragile sheets. These prints were not washed before lining, as the previous repairs would have detached from the prints; therefore, after humidification, the prints were lined with Japanese paper and wheat starch paste.

Preparation of wheat starch paste, which was used for lining.

Lining a print. After the object was humidified, it was placed on a sheet of Melinex. The verso of the object was pasted with wheat starch paste using a Japanese brush.

A sheet of Japanese tissue was cut slightly larger than the size of the print and placed on a sheet of Melinex. The tissue was then sprayed with water to gently humidify it and prepare it for lining. It was then lifted with the Melinex attached and positioned on top of the print.
The Japanese tissue was then pressed gently yet firmly against the verso of the pasted print. Using the palm of our hands and a Japanese brush, we ensured there were no air bubbles present between the sheets. The Melinex supporting the Japanese tissue was then slowly rolled away and a sheet of Bondina was placed on top.

The object was then turned over and the Melinex on the recto of the print was removed in the same way.
The prints with the excess lining tissue were then placed on a wooden board and strips of gum tape were adhered to each edge. This method gently pulls out any creases whilst the objects are drying.

After the prints were dry, the excess tissue was trimmed with a scalpel and ruler. Afterwards, the prints were pressed.
‘Before’ and ‘After’ example : Ferrar Print No. 1, ‘The Resurrection’
The Resurrection print was quite interesting to work on. The print itself was very delicate; the paper was thin and there were areas of missing and detached text. Richard and I spent some time trying to position a detached piece of text back into the correct place on the print, but as there were large areas of missing text, it was difficult to determine where exactly this fragment was meant to go. Elenor Ling, Curatorial and Research Assistant at the Fitzwilliam Museum, managed to locate the same image on the Rijksmuseum Museum website, which allowed us to find the position of the detached text by referring to an ‘in tact’ version (thank you Elenor).

The Resurrection before and after conservation work, which included dry surface cleaning, float and immersion washing, lining and reattaching of fragmented text.
Blotter washing in the Old Library
I came across two severely damaged prints that were in very poor condition. Both prints were heavily creased; there were areas of tears and missing areas; and there were large areas of staining. Having used fewer materials than I expected over the last three weeks, I thought it might be a good idea to try washing one of the prints using spare sheets of blotter paper.Blotter washing is a type of washing treatment used in paper conservation to remove impurities from the paper. As well as reducing discolouration, washing paper is useful to remove attachments from the sheet that are no longer required. A blotter wash is useful for objects that are structurally damaged or contain friable media and need continuous support during the treatment. The print I wanted to wash was very delicate and I believed it would benefit from some gentle washing, which would reduce staining and discolouration.
Step 1: Humidification.
Before washing could begin, the object was dry surface cleaned and it was then humidified, which allows the paper fibres to relax. Using a small water spray, the print was evenly humidified on the flat surface of the table.

Humidifying the print
Step 2: Realigning.
Once the paper started to relax, realigning of tears, creases, folds and fragments began, using a spatula.

Realigning the print
Step 3: Blotter wash.
Two pieces of blotter paper were used for this treatment, both slightly larger than the object. The sheets of blotter were dampened with water and placed on the flat surface of the table on a sheet of polythene. The humidified object was then positioned on the wetted blotters (on a sheet of Bondina), which are always less wetted than the object; this is so the blotters can ‘drink’ the water from the object, which is called capillary action. Capillary action is the mild action of the paper fibres pulling discolouration out of the object. Using two sheets of blotter allows the conservator to swap the blotters when one gets dirty. A second piece of Bondina was placed over the top of the object to protect the image area and using the palm of my hand, I gently smoothed out any air bubbles that can become trapped between the object and the blotters. A sheet of glass was then placed on top of the object and blotters, which prevents the object from drying out and keeps everything in contact. The glass sheet also allows for the conservator to observe the object during washing.
After ten minutes, I removed the glass to check the object and the blotters; some discolouration had successfully been pulled out of the object, which indicated this treatment was working. I then decided to leave the object in the blotter wash system 30 minutes in total before checking it again. The second check showed the success of this treatment and a further 30 minutes were added to the wash, resulting in a blotter wash of one hour.

The blotter after one hour, which shows discolouration that has been pulled from the object.
Step 4: Drying and flattening
Once the object had been washed, it was dried and pressed between dry blotters, under glass and weights for one day.

Ferrar Print No.294 – the recto and verso before and after a one-hour blotter wash. The verso shows the object looking much brighter after treatment, where staining has been reduced and large amounts of discolouration pulled out.
